To begin, click "Design My Pattern" to customize your checkerboard design. If you have a custom pattern in vector format, enter the size in inches (up to three decimal places) in the pricing tool, then click "Get Started" to upload your artwork and view your digital proof. Please note that proofs may not reflect the final print quality. Read More
Intrinsic and extrinsic parameters of a camera explained in 5 minutes
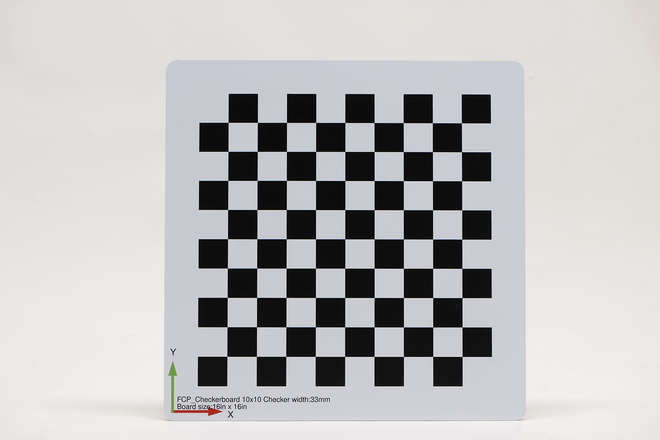
Checkerboard Calibration Targets
Our professional checkerboard calibration targets are engineered for reliable feature detection across indoor and outdoor environments. Offered in rigid ACM or durable Polyurethane, they are ideal for both 2D and 3D calibration applications where accuracy is critical.
What Are Checkerboard Targets?
Our checkerboard calibration target is made from an ultra-flat, rigid, yet highly durable, lightweight metal panel (ACM) and is designed for indoor and outdoor use. The material's surface finish inherently has a sheen that is detectable in well-lit applications. For an ultra-matte finish that is easier to detect in machine vision pipelines, consider our polyurethane option. Options for our checkerboard targets include rounded corners (for easier handling of larger targets), special cuts (cut-to-shape), and single- or double-sided printing.
We offer a wide range of sizes to accommodate large or small fields of view with a highly accurate manufacturing tolerance of .004". We digitally print your target at 1,200 DPI using UV direct printing. The UV ink produces smooth, rich, authentic colors that are weather-resistant and will stand the test of time.
Upload your own file or click "Design My Pattern" to get started, and choose from grid types, including Checkerboard. Make it unique by configuring each detail and option that best suits your needs. If you have a custom calibration pattern, click "Get Started" and then upload your artwork. After that, we will carefully print, cut, pack, and ship your checkerboard targets so they arrive safely and in pristine condition, ready to help you calibrate your imaging systems.

Checkerboard Targets Features

UV Direct Printing

Precision Manufactured

Anti-Reflective Surface


Wide Range of Sizes

Rounded Corners

Custom Shapes, Drill Holes & More
Antireflective, Near-Lambertian Surface
(Ultra-Matte Finish · Near-Lambertian Surface on ACM)All checkerboard targets are printed using our ultra-matte process by default, creating a highly diffuse white surface that minimizes glare and reflectance variation. When produced on ACM (Aluminum Composite Material), the full-coverage UV-cured white ink produces near-Lambertian reflectance across the visible and near-IR spectrum, helping ensure consistent corner contrast from any viewing angle.
This reduces specular highlights and uneven reflections that can introduce corner-detection errors—especially in uncontrolled lighting or during calibration of active sensors. The UV-ink surface on ACM is scratch-resistant and suitable for both indoor and outdoor calibration setups.
ACM – Technical Material Specs
ACM Material Specifications
Polyurethane – Technical Material Specs
Polyurethane Material Specifications
Checkerboard Target Design & Order Process
You will first need a pattern to get started, and we offer two easy design options to order your checkerboard targets. You can use our pattern generator to complete your order or upload your own design. You'll choose your preferred finish options throughout the checkout process, then just a few clicks to enter each quantity and complete your order!
Checkerboard Pattern Generator
Control your Checkerboard target details with our checkerboard pattern generator. Modify details such as board height, width, the number of rows, columns, checker width, and more. Grid type:
-
Checkerboard
Upload Your Own Design
To begin your order with your own design. Click the button below, drag all files into the "file uploader," and proceed to update your board dimensions and finish options. View and approve your online proofs, and wait for delivery! View File Requirements & Helpful Ordering Tips.
-
Accepted file formats: .pdf, .ai, .eps, and high-resolution full-scale .tiff, .tif, .jpg, .jpeg, and .png files.
Helpful Ordering Tips When Uploading Your Own Designs
These tips will help you through checkout and ensure your targets deliver the best results!
- Always submit full-scale 1:1 files and adjust the product dimensions to match your file size If necessary, use decimals (this will avoid unwanted scaling).
-
Upload vector PDF or AI file format in CMYK color mode for optimal print results.
-
Double-check to compare your file size to each product size during the proofing process. Make sure they are 1:1. If they are not, you can either remove the files and reupload the corrected versions or update the product finish size to match the file size (repeat step one).
-
FoamCorePrint is not responsible for incorrect patterns or finished product sizes due to improper scaling of customer-submitted artworks.
-
Submit your files for review - We encourage first-time customers to contact our customer support to review all print files before placing orders via live chat or email.
Why FoamCorePrint?
Award-Winning Customer Service
Our US-based customer support staff is ready to answer any questions during the ordering process and can assist via live chat, phone, and email.
Manufactured In The USA
We proudly print, cut, and ship each target to order in-house in Southern California.
Guaranteed Quality
We guarantee you'll love your high-quality calibration targets. If you don't, we'll be sure to make it right. Learn More
Enjoy Flexible Ordering
Order what you need when you need it, and get discounts buying more in bulk.
Additional Camera Calibration Information
Camera Cailbration Checkerboard, Print-Out Checkerboard, Checkerboard Pattern
What Is Camera Calibration?
The Calibration Process
Almost similar steps work when calibrating two or more cameras and one camera. Here is a quick breakdown of the camera calibrating process:
- Choose a pattern. Download it or create your own.
- Mount your pattern on a flat, rigid surface
- Take images of your checkerboard target in various orientations and distances.
- Download photos to compute and pick the above images that are in focus
- Automatically detect the target and compute the parameters using provided examples.
- Move your calibration file to a secure location.
While you can use any calibration target, it is essential to note that a checkerboard one tends to provide slightly more accuracy.
Camera Calibration with OpenCV
Next, project the point onto an image plane using your camera's intrinsic parameters (In 3D computer graphics, the image plane is that plane in the world which is identified with the plane of the display monitor used to view the image that is being rendered. It is also referred to as screen space. If one makes the analogy of taking a photograph to rendering a 3D image, the surface of the film is the image plane)
Following figure shows the example of algorithm relating 3D points (Xw, Yw, Zw) in world coordinates to its projection (u, v) in the image coordinates are shown below.
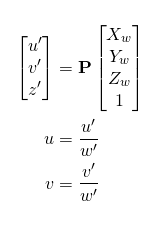
Where P represents the 3×4 Projection matrix that has two parts
- The intrinsic matrix (K) containing intrinsic parameters
- the extrinsic parameter (R | t) includes the R- 3 x 3 rotation matrix and the translation vector t (3 x 1).

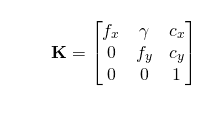
- fx, fy represent the y and x focal lengths
- cx, and cy is the optical centers of y and x coordinates. Using an images center is typically an adequate approximation.
- Gamma represents the skew between the axes, which is typically 0.
The Purpose of Camera Calibration
The process aims to detect the 3×3 rotation matrix (R), 3×1 translation vector (t), and the 3×3 matrix K using known 3D points (Xw, Yw, Zw) and their image coordinates (u, v).
The camera is termed as calibrated upon attaining extrinsic and intrinsic parameter values.
In simple terms, the camera calibration algorithm contains these inputs and outputs.
- Inputs: A set of images captured containing points with the known 3D world coordinates and 2D image coordinates
- Outputs: The translation, rotation, and 3×3 intrinsic camera matrix for every image captured.
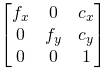
The camera's intrinsic matrix lacks skew parameters in OpenCV. Therefore, the matrix is as the following figure shows.
Text goes here ...
Camera Calibration Methods
Calibration Patterns
Why Is the Checkerboard Calibration Popular?
Geometric Clues
Deep Learning-Based Method
Step By Step Analysis of Camera Calibration
Definition of Real World Coordinates Using Checkboard Pattern
Take Many Checkerboard Images from Various Viewpoints
Determination of the checkerboard's 2D Coordinates
Identifying Corners


In which,
- Image is the source chess board view (must be a colored image or 8-bit grayscale image)
- patternSize, which denotes how many inner corners on every chessboard, column and row, and column
- Corners signify detected corners' output array.
- flags which are the numerous operational flags
Refining Checkerboard Corners


In which,
- Image refers to the input image.
- Corners are the input corners' initial coordinates and the refined coordinates given for output.
- winSize is half the side length of your search window
- zeroZon refers to the half-size of the dead region within the search zone's center, of which the totals don't form part of the following algorithm. The zeroZone is applicable sometimes when avoiding an autocorrelation matrix/ possible singularities. (-1,-1) values indicate that such a size is non-existent.
- Criteria refer to the basis for the termination of the corner refinement iterative procedure. This means that the corner position refinement process halts after the angular position adjusts by less than criteria.epsilon in an iteration or post the criteria.maxCount iterations.
Calibrate Camera


In which,
- objectPoints refer to a vector of the 3D image where the exterior vector has its number of elements similar to the pattern views.
- imagePoints that is the 2D image points' vector.
- imageSize, which represents what it implies
- cameraMatrix which is the internal camera matrix
- distCoeffsthat refers to the coefficient of the lens distortion
- rvecs, which is a rotation denoted as a 3×1 vector: the vector's size indicates its rotation angle, whereas its direction signifies the rotation axis.
- tvecs, which is a 3×1 vector that expresses displacement as is like the rvecs
What Is the Diffrence Between Checkboard Targets and Checkerboard Maker Targets?
Accurate calibration of cameras is essential and requires picking the right checkerboard target. While there are various targets to pick from, checkerboard calibration patterns and checkerboard maker targets are some of the most popular.
So what are their differences?
Checkerboard Targets

The pixel binarization of an image captured by the camera image and determination of its quadrilaterals (black chessboard fields) helps detect chess board corner candidates. Image binarization is the transformation of document image into bi-level document image. Image pixels are separated into dual collection of pixels, i.e. black and white pixels. The main goal of image pixel binarization is the segmentation of document into foreground text and background.
A pixel separation process keeps quads of a particular size organized in an orderly grid structure with dimensions similar to user-specified requirements.
Upon pattern detection, it is straightforward to detect corner locations with extra high accuracy. This is due to corners being typically infinitely small and therefore unbiased under lens distortion or perspective transformations.
The whole chessboard needs to be visible in OpenCV for all images for it to get detected. This makes it challenging to attain details about the farthest ends of images. These image areas are vital for attaining particulars since they properly restrict the lens distortion model.
Upon the checkerboard's detection, you can perform subpixel refinement to detect saddle points with accuracy. This uses similar gray values of pixels in a particular corner position. Moreover, it is more accurate than what you get with integer pixel positions.
Checkerboard Marker Targets

Image source: Checkerboard Marker Target
Final Thoughts
Reviews for Checkerboard Calibration Targets
Rating
Frequently asked Questions
FAQ
It is a physical object which consists of a specified calibration pattern and whose function is to act as a standard in the measurement and adjustment of the color responsiveness of instruments. The process requires very high accuracy to enable transformation generation with a similar degree of precision.
It is a type of calibration target used in the process of calibrating cameras when taking pictures. It is usually made up of black and white squares that are arranged on a square grid so that they create alternating rows with one black square followed by one white square, then another black square, etc.
These targets are used to calibrate the sensors in a camera. This is done by taking multiple pictures of a checkerboard with the sensor and then comparing them against one another to find out how far off they are from being perfectly aligned. Created by Zhang camera calibration methods involving using fabricated 3D apparatus with painted checkerboard patterns, like two orthogonal planes hinged together. With this technique, the camera records the projection of a 3d scene onto a 2D image plane. As such, it's easy to determine the camera parameters with a camera focus chart.
Everything Foam Core Print offers is manufactured to spec or "custom to order," meaning the clients selects the exact finish size down to 100th of an inch. We can manufacture targets as small as 4x4" and as large on one sheet at 48x96 on the Dibond panel.
Our standard production turnaround is 3 business days, starting after final artwork approval, not at the time of purchase.
We also offer next-day and same-day production options for qualifying orders. Production cut-off times are:
-
3-Day Standard Turnaround: Orders approved by 10:00 AM PST
-
Next-Day & Same-Day Production: Orders approved by 8:00 AM PST
Turnaround availability and pricing are automatically calculated by our website. To view accurate pricing, shipping options, and delivery timelines, simply add your items to the cart and proceed to checkout—entering your ZIP code will display the final totals and available production options.
Yes — our checkerboard calibration targets are suitable for outdoor and wet-environment use, with waterproof performance depending on the selected material.
-
ACM (Aluminum Composite Material):
Fully weather-resistant and waterproof. ACM will not absorb moisture, warp, or swell, making it ideal for long-term outdoor use, wet conditions, or environments with temperature and humidity changes. -
Polyurethane:
Water-resistant and suitable for outdoor use and light exposure to moisture. Polyurethane does not absorb water like paper-based materials but is best suited for short-term outdoor use or controlled environments rather than continuous exposure to standing water.
All checkerboard targets are printed using UV-cured inks, which are water-resistant and designed to withstand outdoor conditions.
All products ordered from this category page will automatically get a "Ultra Matte " true matte finish. It's this anti-reflective surface "flood white" authentic matte finish that allows for easy detection in your computer vision pipeline because of its optical performance and physical robustness.
The physical weight (.125" Dibond) is 0.78125 lbs per ft.². The formula for weight calculation on your specif dimension product can be figured by multiplying your length x width divided by 144 = Your Physical Weight.
A Cut option is NOT required; it is a unique finishing option for shapes other than squares or rectangles, drill holes, or a particular size or placement.
- Special-Cut (custom shape, inside and outside cuts are okay) ** requires additional art set up; check out How to Set Up-Cut Files.
No probelm at all! We offfer a free online checkerboard pattern generator to help you create images designed to your owns specific checkerboard calibration requirements.
There are many ways to mount and hang camera calibration targets and Dibond signs; Here is a list of a few hanging methods.
- Screws and Bolts
- Flush mount on a wall with drill holes
- French cleats
- Hang on walls with 3m adhesive strips or double side Velcro tape
- Double-sided acrylic VHB tape (great for long terms use)
- 3M adhesive-backed hooks
File types accepted for checkerboard calibration: Photoshop (PSD, TIFF, EPS, PDF, JPEG, PNG, SVG) **special cut require Illustrator set up (AI, PDF, with all fonts outlined) Any other graphic program capable of creating a PDF, TIFF, EPS, JPEG, PNG, SVG file. However, The best file formats are PDF and AI files. Vector PDFs are our preferred file format. Vector files are created with shapes and colors and will always print at 300dpi at any scale. Check out our free online checkerboard calibration pattern generator and start making vector PDF patterns today!
There is always a lifespan on any product. If the products are cared for, cleaned, stored away correctly, they will last many years. Our checkerboard calibration techniques use UV-coated permanent LED inks are designed to hold up over time to sunlight. The more direct contact with the daylight your prints have will impact the longevity of your prints. Generally 3-5 years before you notice sunfading to the naked eye.
Yes, you can print whatever file you like on the back. All pricing is square-foot based; pricing will not change based on the number of uploaded artworks.
Cleaning these targets is simple and very easy. Here is a list of things you'll need along with instructions;
- Two microfiber cloths
- One medium-size bowl
- Dish soap (dove works great)
- Hot or warm water, a bucket would be great.
Step by Step Instructions
- Use the first microfiber cloth and warm water to wash off any easy-to-remove dirt.
- Place an empty bowl next to your target.
- Add dish soap into the bowl and add warm water.
- Soak the microfiber cloth in the soap water and gently wipe down the checker board.
- Be sure not to rub or wipe too hard; pay attention not to scratch the surface.
- Take your second and final microfiber cloth and dry off all remaining water until dry to the touch.
- Repeat steps 4 through 6 until you are happy with the results.
Great question! Please DO NOT send art files to print if you have any questions about your online proofs. Please contact us via live chat, email at info@foamcoreprint.com, or call 855-465-7744 before sending files to print. There is a 10 min window approved proofs can be removed and taken out of the production line; clients can remove approved art files within the 10 min window from the user dashboard in the order history tab.
YOU MAY ALSO LIKE
Notify on stock availability